INTRODUCTION
Microtia is mainly characterized by hypoplasia of the auricle, external auditory canal, and middle ear. It usually affects both appearance and hearing. The core of microtia reconstruction is framework fabrication, and an exquisite framework can increase the satisfaction rate and meet the natural aesthetic requirements. (Plast Reconstr Surg. 2014;133(5):1168-1174). In this article, we presented a quantitative framework fabrication technique which mainly needs three rib cartilages. Redesigning the tragus saves the use of cartilage and leaves sufficient concha space for canalplasty. This technique can achieve satisfactory aesthetic results with few complications.
Explore This Issue
June 2024METHODS
Our team has used autologous costal cartilage in microtia reconstruction since 2005. From January 2020 to September 2021, patients with congenital microtia who underwent two-stage microtia reconstruction at a tertiary referral hospital were selected for this study. The first stage is framework fabrication, implantation, and simultaneous lobule rotation, and the second stage is auricular elevation. Some patients need to do the third stage for canalplasty. Our study protocol was approved by the Institutional Board of EYE & ENT Hospital and performed in accordance with the Helsinki Declaration. Patient data were made anonymous for confidentiality. Written informed consent was obtained from each patient.
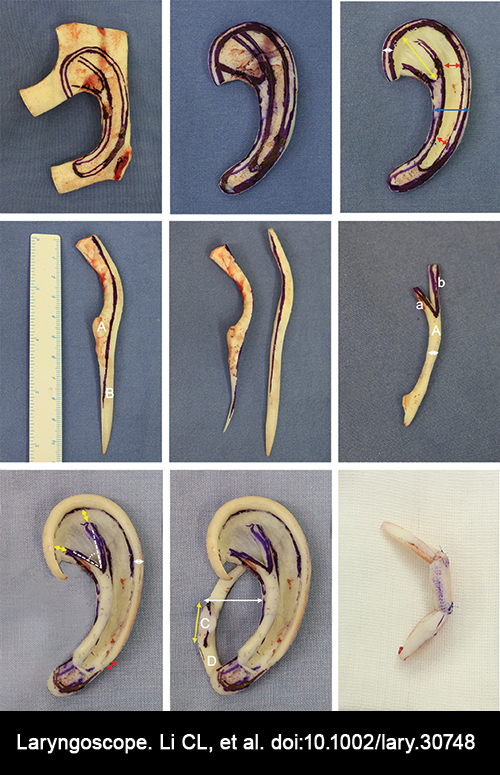
Figure 1. Framework fabrication. (Above, left) Design the base frame on the connected sixth and seventh costal cartilages. (Above, center) Carving the designed base frame. (Above, right) Fabricate the three-dimensional structures like the triangular fossa and scapha. The white arrow shows the outer ring of the frame is 2 mm wide; the blue arrow shows the middle part of the frame is approximately 10 mm wide, the yellow arrow shows the length of the triangular fossa is approximately 15 mm; the red arrow shows the width of the scapha is 4–5 mm at the bottom and widens upward gradually. (Center, left) Design the helix and antihelix structures on the eighth costal cartilage, Part A for the antihelix and Part B for the helix (Center, center). Cut off the designed cartilage. (Center, right) The width ratio between the inferior crura of the antihelix (a) and the superior crura of the antihelix (b) is 1:2. The white arrow shows the antihelix is approximately 2 mm wide. (Below, left) The opening angle of the triangular fossa is approximately 45°; the yellow arrow shows the distance between the tip of the antihelix with the helix is approximately 5 mm; the white arrow shows the width of the helix is approximately 2 mm; the red arrow shows the bottom of the helix structure should reserve 5 mm for connecting to the rotated lobule. (Below, center) Part C is the tragus, which curves slightly. The thickness is 2 mm, the height is 7–8 mm, and the yellow arrow shows the length is approximately 10 mm. Part D is the cartilage piece shoveled from the scapha. The white arrow shows the space of the cavity of the concha is at least 15 mm to accommodate future canalplasty. (Below, right) A C-shaped cartilage stent is fabricated with residual costal cartilage.