INTRODUCTION
Slide tracheoplasty for congenital tracheal stenosis is a low-volume, high-stakes operation in which it may be challenging to gain proficiency, thus providing the optimal setting for simulation-based training (Otolaryngol Clin North Am. 2022;55:1253-1270). Three-dimensional (3D)-printed models have been described for the simulation of this procedure but aren’t widely popularized. We describe our stepwise protocol for the creation of high-fidelity patient-specific 3D models of the pediatric airway to be used for the simulation of slide tracheoplasty; our aim is for surgeons to use this protocol as a framework to improve pre-operative surgical preparation, surgical training, and multidisciplinary patient care for this procedure.
Explore This Issue
July 2024METHODS
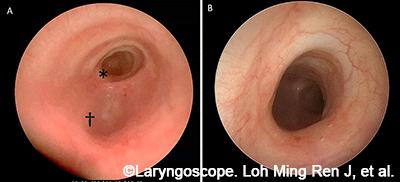
A sample patient case is described to fully illustrate the model development process from data acquisition to the finalized 3D model. The patient was a seven-year-old with a history of right-dominant atrioventricular canal defect and hypoplastic aortic arch. Computed tomography angiogram (CTA) revealed a segment of complete tracheal rings. After a multidisciplinary conference, the patient was recommended for surgery with pulmonary vein repair, aortic arch revision, right ventricle to pulmonary artery (RV-PA) conduit replacement, and slide tracheoplasty. Pre-operative bronchoscopy demonstrated distal congenital tracheal stenosis with a segment of three complete tracheal rings with a diameter of 3.0 mm and a shallow tracheal diverticulum just proximal to the tracheal rings posteriorly (Fig. 1).

Figure 1. Clinical imaging of patient with complete tracheal rings. (A) Endoscopic view from the proximal airway. (B) Endoscopic close-up: complete tracheal rings.
Step 1: Image Acquisition and Segmentation The raw Digital Imaging and Communications in Medicine (DICOM) images from CT scans are de-identified and transferred into a 3D medical image segmentation software. The airway, lung volumes, and cardiac anatomy are digitally segmented. Clinical endoscopy data are reviewed to evaluate and revise the masks to include/exclude any artifacts that might be present (e.g., granulation tissue, airway, and cardiac devices, etc.).
Step 2: Trachea Model Design The airway images are converted to a single object and imported into 3D printing, design, and remeshing software that allows for further digital manipulation. A stepwise workflow then proceeds. First, a 1-mm wrap is performed to generate an outer surface with a smooth contour. This is synonymous to a homogeneous tracheal wall. The posterior wall of the trachea is formatted to create the trachealis in the final model. Next, the cartilage rings are formed by creating an outer shell that is trimmed and smoothed with two passes of a Laplacian filter, then wrapped with a gap closure of 5 mm, having a smallest detail of 0.15-mm and a 0.2-mm offset. The bounding box is then created to encompass the part. The inner shell branches are trimmed to isolate the inner lumen from the outer box.
Step 3: Preparation for Model Printing After the final airway is designed, the model is then printed on a Stratasys J750 PolyJet printer with the following components: inner lumen (priority 1) in GelMatrix and Vero inks patterned to provide a cleanable negative space with sufficient structure to support the outer layers, trachealis (priority 2) in Agilus and Tissue Matrix (75/25%), cartilage (priority 3), Agilus and Vero Magenta (30/70%) (priority 4) and outer wall (priority 4) in pure Agilus. When applicable, the cardiac structures are printed in a mixture of Agilus (1-mm outer) and inner core of Tissue Matrix and GelMatrix in a gyroid pattern.